Manual Window Regulator: A Comprehensive Guide
Navigating manual window regulator repairs demands understanding component costs, potential dealer diagnostics, and the availability of upgraded clips—especially for VW MK4 models.
Understanding Manual Window Regulators
Manual window regulators represent a straightforward mechanical system for operating vehicle windows, relying on physical effort rather than electric motors. These systems, while simpler than their powered counterparts, are prone to specific issues requiring attention. Understanding their function is crucial for effective repair. The cost of a regulator itself remains fairly consistent – around $100 for both the consumer and the shop, though markups can significantly inflate the final price.
For vehicles like the MK4 VW, regulators are notorious for failure, prompting the availability of upgraded metal clips to address common weak points. Troubleshooting often involves assessing symptoms, and dealerships possess specialized tools for comprehensive electrical component testing. However, a careful assessment of the situation can often pinpoint the source of the problem, allowing for a DIY repair approach.
What is a Manual Window Regulator?
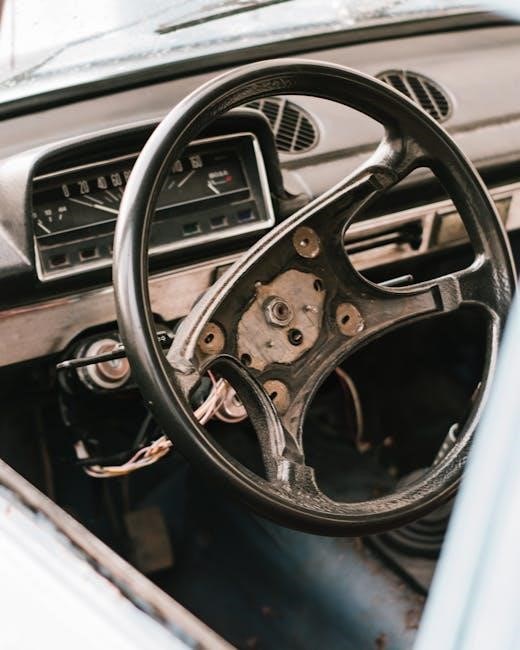
A manual window regulator is the mechanical assembly within a vehicle door that allows a driver or passenger to raise and lower a window using a hand crank. Unlike power window systems, it doesn’t rely on an electric motor; instead, it utilizes a series of gears, cables, or linkages connected to the window glass. This system translates rotational force from the crank into linear motion for the window.
Repairing these regulators often involves removing the door panel and disconnecting the window. Once unbolted, the window lacks support and can pivot downwards, necessitating careful handling. Replacing the regulator is often recommended once access is gained, as the process is similar to diagnosis. Understanding this core function is vital before attempting any repair work.
Components of a Manual Window Regulator
A manual window regulator isn’t a single piece, but an assembly of several key components working in unison. These typically include a hand crank, a drive motor (though manual, it’s the force applied), a gear set that converts rotational motion, and a system of cables or linkages. These cables or linkages directly connect to the window glass, guiding its vertical movement within the door frame.
Crucially, regulator clips secure the window to the regulator mechanism. These are often points of failure, particularly in vehicles like the VW MK4, necessitating upgraded metal replacements. The entire system is housed within the door cavity, requiring careful disassembly to access and repair individual parts.
Common Problems with Manual Window Regulators
Manual window regulators, while simpler than powered systems, aren’t immune to issues. A frequent complaint is a window that won’t stay up, often stemming from worn or broken regulator clips – a known weakness in VW MK4 models. Slow window operation indicates increasing friction within the mechanism, potentially due to cable fraying or lack of lubrication.
Distinct grinding or clicking noises during operation signal significant wear or damage to the gears or cables. These sounds often precede complete failure. Ignoring these symptoms can lead to the window dropping entirely, or the regulator becoming completely seized, requiring full replacement and potentially expensive repairs, especially on vehicles with specialized components like the DOR radiator.
Window Won’t Stay Up
When a manual window repeatedly falls down after being raised, the primary suspect is often worn or broken regulator clips. These clips, particularly problematic in VW MK4s, secure the window to the regulator mechanism. Once they fail, gravity takes over, and the window descends. This issue isn’t necessarily a sign of a completely failed regulator, but ignoring it will lead to further damage.
The cost to repair this is relatively low, as the clips themselves are inexpensive. However, accessing them requires door panel removal and regulator inspection. Shops often mark up parts significantly, potentially doubling the cost. Addressing this promptly prevents more extensive, and costly, repairs down the line, avoiding potential issues with other expensive vehicle components.
Slow Window Operation
Experiencing sluggish window movement suggests increased friction within the manual window regulator system. This could stem from several factors, including dried-out lubrication, bent regulator components, or internal corrosion. While not an immediate failure, slow operation indicates impending issues and should be addressed before complete stoppage occurs. Ignoring this symptom can exacerbate wear and tear on the entire mechanism.
A shop visit might involve a full regulator inspection, potentially leading to a complete replacement, which will be marked up from the original part cost. However, sometimes simple lubrication can temporarily alleviate the problem. Regular maintenance and inspection can prevent this, and avoid the need for expensive replacements like a DOR Direct Ozone Reduction radiator on certain vehicles.

Grinding or Clicking Noises
Distinct grinding or clicking sounds during window operation are strong indicators of significant wear or damage within the manual window regulator. These noises often originate from worn gears, damaged cables, or a regulator that’s becoming increasingly misaligned. The sounds suggest metal-on-metal contact, accelerating further deterioration of the system.
Ignoring these sounds can lead to complete regulator failure, potentially leaving the window stuck in an open or closed position. Repairing or replacing the regulator is crucial. Be aware that parts costs can vary significantly – a shop might mark up the price considerably. For some vehicles, like those needing a DOR radiator, parts are exceptionally expensive and hard to find.
Tools Required for Manual Window Regulator Repair
Successfully tackling a manual window regulator repair necessitates a specific toolkit. Essential items include a screwdriver set (Phillips and flathead), needle-nose pliers for manipulating clips and cables, and potentially a socket set for removing door panel hardware and regulator bolts. A panel removal tool minimizes damage to the door card during extraction.
Depending on the vehicle, specialized tools might be needed. Having a backup regulator on hand is wise, as completing the job once the door card is off is highly recommended. Remember, some components, like a DOR radiator for certain vehicles, are notoriously difficult to source and expensive, so preparation is key.
Safety Precautions Before Starting
Prioritizing safety is paramount before commencing any manual window regulator repair. Disconnect the vehicle’s battery to prevent accidental electrical shorts. Wear safety glasses to protect your eyes from debris, and gloves to shield your hands from sharp edges within the door panel.
Be acutely aware that once the window is detached from the regulator, it’s unsupported and can fall or pivot unexpectedly. Exercise extreme caution to prevent injury. If dealing with a vehicle known for expensive parts – like those with a DOR Direct Ozone Reduction radiator – understand the potential costs if something goes wrong, and proceed carefully.
Step-by-Step Repair Guide
Begin by carefully removing the door panel, often secured by screws and clips – a process requiring gentle prying to avoid damage. Once the door card is off, locate and unbolt the window from the existing regulator mechanism. Remember, with the window unbolted, it lacks support and can easily pivot downwards, so be prepared to control its movement.
At this stage, if you’ve already acquired a new regulator, it’s often efficient to proceed directly with installation rather than halting mid-disassembly. This minimizes the risk of leaving the window unsecured for an extended period. Ensure all connections are secure before proceeding.
Removing the Door Panel
Initiating the repair necessitates careful door panel removal. Begin by locating and unscrewing any visible fasteners – often found within the door handle recess, armrest, or along the lower edge of the panel. Once the screws are removed, the panel is typically held in place by plastic clips. These require gentle but firm pressure to release; a plastic pry tool is invaluable here to avoid damaging the panel or the door frame.
Work your way around the perimeter, carefully prying the clips loose. Once all fasteners and clips are disengaged, lift the door panel upwards to dislodge it from the window sill. Be mindful of any wiring harnesses connected to the panel – disconnect these before fully removing the panel, noting their positions for reassembly.
Disconnecting the Window from the Regulator
With the door panel removed, access to the window regulator is revealed. Before removing the regulator itself, the window must be disconnected. Typically, the window is bolted to the regulator at several points – usually three or four. Carefully unbolt these fasteners, supporting the window’s weight as you loosen the final bolts.
Crucially, once unbolted, the window has no inherent support and can pivot downwards within the door frame. Exercise extreme caution to prevent the window from falling or being damaged. A second person to assist in supporting the window is highly recommended. Remember, with the window detached, it’s a good time to consider completing the regulator replacement.
Removing the Old Regulator
After disconnecting the window, the removal of the old manual window regulator can begin. Typically, the regulator is secured to the inner door frame with several bolts; Locate and remove these bolts, noting their positions for reassembly. Be prepared for the regulator to be somewhat stiff or resistant to movement, especially if it hasn’t been serviced in a long time.
Gently maneuver the regulator within the door cavity, carefully guiding it past any obstructions like wiring harnesses or the door’s internal mechanisms. Once clear of all attachments, the old regulator can be lifted out of the door. Inspect the removed regulator for any obvious signs of damage or wear, which can help diagnose the original problem.

Installing the New Manual Window Regulator
With the old regulator removed, carefully position the new manual window regulator into the door cavity. Align it with the mounting points and secure it using the bolts previously removed, ensuring they are tightened to the manufacturer’s specified torque. Double-check that the regulator is seated correctly and moves freely within its designated space.
Before fully securing everything, briefly test the regulator’s movement to confirm it operates smoothly. This preliminary check can identify any immediate issues before proceeding with the complete reassembly. Proper installation is crucial for the regulator’s longevity and the window’s functionality, so take your time and ensure everything is aligned correctly.
Attaching the New Regulator
Carefully position the new regulator within the door frame, aligning it with the pre-existing bolt holes. Secure the regulator using the original bolts, tightening them gradually in a criss-cross pattern to ensure even pressure and prevent warping. Avoid over-tightening, as this could damage the regulator or the door panel.
Confirm the regulator’s movement isn’t obstructed by any wiring or components within the door cavity. A slight preliminary test of the regulator’s mechanism—before fully reassembling—can reveal potential binding issues. Proper attachment is paramount; a securely mounted regulator is essential for smooth and reliable window operation, preventing future complications and ensuring long-term functionality.
Reconnecting the Window to the Regulator
With the new regulator securely in place, carefully maneuver the window glass back into position, aligning it with the regulator’s mounting points. Reattach the window to the regulator using the original bolts, again tightening them gradually and evenly. Remember, once unbolted, the window lacks support and can pivot downwards, so proceed with caution and have a helper if possible.
Ensure the window slides smoothly within the regulator’s tracks before fully tightening the bolts. A slight adjustment may be needed to achieve proper alignment. This step is critical; a misaligned window can bind, causing damage to both the glass and the regulator. Double-check all connections for security before proceeding to the final testing phase.
Testing the New Regulator

After reconnecting the window, thoroughly test the new manual window regulator’s functionality. Manually operate the window through its full range of motion – both up and down – several times. Observe for any signs of binding, grinding, or uneven movement. Listen carefully for any unusual noises that might indicate a problem with the installation or a faulty regulator.
Verify the window stays securely in both the fully open and fully closed positions. If it drifts or doesn’t latch properly, re-examine the connections and alignment. A successful test confirms the regulator is functioning correctly and the repair is complete. Remember to reinstall the door panel, ensuring all wiring and components are properly connected.
Specific Vehicle Considerations (MK4 VW Example)
For the MK4 Volkswagen, manual window regulator issues are notoriously common, often stemming from failing plastic clips. Many owners experience regulator failure, prompting a search for solutions. Interestingly, the manual and power window regulators share the same part number, but the crucial upgrade lies in replacing the original plastic clips with robust metal alternatives.
These upgraded metal clips address a known weakness in the VW design. When tackling a repair on a two-door TDI model, consider this clip upgrade proactively. It’s a preventative measure that can save future headaches; VWs of this era are prone to this specific failure point, making the metal clip a worthwhile investment during regulator replacement.
Upgraded Regulator Clips
The frequent failure of original plastic window regulator clips, particularly in MK4 VWs, has spurred the development of upgraded metal replacements. These aren’t merely aftermarket accessories; they address a fundamental design flaw. Shops and DIY mechanics alike recommend switching to metal clips during any regulator repair or replacement, offering a significant boost in longevity and reliability.
While the initial cost is slightly higher, the long-term savings from avoiding repeat repairs are substantial. Searching online for “manual window regulator repair” often reveals the importance of these clips. They are a direct solution to a common problem, preventing the window from slipping and ensuring smooth operation. Consider them an essential component of any MK4 window regulator project.
Cost of Parts and Labor
Expect to pay around $100 for a manual window regulator part itself, a price point generally consistent whether purchasing retail or through a repair shop. However, shops typically apply a markup, often around $100, bringing the total cost to approximately $200. Part quality significantly influences price, with OE (Original Equipment) parts commanding a premium. Some shops exclusively use OE components, increasing labor costs.
Furthermore, vehicle-specific parts can be exceptionally expensive; for example, a DOR Direct Ozone Reduction radiator can exceed $1,000 due to limited availability and a lengthy waitlist. Labor costs vary, but factor in potential expenses if the vehicle requires specialized or hard-to-find components.
Retail vs. Shop Pricing
Generally, the core cost of a manual window regulator remains consistent – around $100 – whether sourced directly from a retailer or through an automotive repair shop. However, the final price presented to the customer diverges significantly. Shops routinely implement a markup, frequently around $100, effectively doubling the component cost to approximately $200. This markup covers overhead, expertise, and profit margins.
Retail pricing offers transparency, allowing direct comparison shopping. Shops, conversely, bundle parts and labor, potentially obscuring individual costs. The choice between retail and shop pricing depends on your mechanical aptitude and willingness to perform the repair yourself versus the convenience of professional installation.
OE Parts vs. Aftermarket Parts
Original Equipment (OE) parts, sourced directly from the vehicle manufacturer, typically command a higher price point due to stringent quality control and guaranteed compatibility. However, some components, like the Direct Ozone Reduction radiator for certain vehicles, may only be available through the OE manufacturer, leading to extended wait times and substantial costs – potentially exceeding $1,000.
Aftermarket parts offer a more affordable alternative, with varying levels of quality. While some aftermarket regulators cost as little as $50-$150, it’s crucial to research reputable brands. For vehicles like the VW MK4, upgraded metal regulator clips are readily available aftermarket, addressing a known weakness in the original design. Choosing between OE and aftermarket involves balancing cost, quality, and long-term reliability.
Troubleshooting Techniques
Effective troubleshooting begins with careful observation of symptoms. Slow window operation, windows that won’t stay up, or grinding/clicking noises all point towards potential regulator issues. Utilizing these clues can narrow down the problem’s source before diving into repairs. For more complex diagnostics, car dealerships employ specialized scanning tools to test the window switch, motor, and related electrical components.
However, a systematic approach is key. Once you’ve identified the likely cause – whether it’s a worn regulator, faulty switch, or damaged clip – gather the necessary tools. Remember, if the window is unbolted from the regulator, it lacks support and can pivot downwards, so proceed cautiously.
Using Symptoms to Diagnose Issues
Pinpointing the root cause of a manual window regulator problem often starts with recognizing specific symptoms. A window that refuses to stay up suggests a worn or broken regulator, potentially needing upgraded clips – a common issue with VW MK4s. Slow window operation could indicate friction within the regulator mechanism or a binding cable.
Distinct grinding or clicking noises frequently signal damaged or worn internal components; Carefully listen to the sound’s origin to help isolate the problem area. Before proceeding, remember that once the window is detached from the regulator, it’s unsupported and can unexpectedly drop. Observing these cues allows for a focused repair approach, saving time and effort.
Dealer Diagnostic Tools
Automotive dealerships possess specialized diagnostic tools capable of thoroughly assessing window regulator systems. These tools can scan and test the window switch, the regulator motor (if applicable, even in manual systems for testing related circuits), and other electrical components within the door. This comprehensive testing helps isolate issues beyond simple mechanical failures, identifying potential wiring problems or control module malfunctions.
While manual regulators are primarily mechanical, associated electrical components still exist. Dealer diagnostics offer a level of precision often unavailable to DIY mechanics. However, remember that even with these tools, a skilled technician’s interpretation of the results is crucial for accurate diagnosis and effective repair recommendations, especially considering potential part costs.
Dealing with Difficult Repairs
Sometimes, manual window regulator repairs present unexpected challenges. A window, once unbolted from the regulator, can unexpectedly pivot downwards due to a lack of support within the tracks – requiring careful maneuvering and potentially a second pair of hands. If encountering significant resistance during removal or installation, reassess the process and ensure all connections are properly disconnected.
Furthermore, heavily corroded components or stripped bolts can dramatically increase repair complexity. In such cases, patience and the correct tools (like penetrating oil or bolt extractors) are essential. If a repair proves overwhelmingly difficult, or if you encounter issues with high-cost components like a DOR radiator on certain vehicles, consider seeking professional assistance to avoid further damage.
High-Cost Vehicle Components (DOR Radiator Example)
While focusing on window regulator repairs, it’s crucial to acknowledge that some vehicle components carry exorbitant costs, potentially impacting repair budgets. The DOR Direct Ozone Reduction radiator serves as a stark example, with a price tag reaching $1,000 and a lengthy waitlist for procurement. Availability is limited to the original equipment (OE) manufacturer, bypassing dealer channels.
This illustrates a broader point: unexpected high costs can arise during vehicle maintenance. Shops may mark up parts significantly – potentially doubling the price – reflecting standard business practices. Being aware of potential expenses, and researching part costs beforehand, can help avoid financial surprises and inform repair decisions, even during a seemingly simple window regulator job.
Finding Replacement Parts
Sourcing replacement manual window regulators involves navigating retail and shop pricing, alongside choices between Original Equipment (OE) and aftermarket parts. Shops typically mark up parts by around $100, meaning a $100 part could be sold for $200. Part costs can vary significantly, ranging from $50 to $150 depending on quality.
For specific vehicles, like the MK4 VW, upgraded metal regulator clips are often recommended, sometimes even being compatible across power and manual regulator types. Online searches can reveal part availability and pricing. However, verifying compatibility is crucial. Considering the potential for expensive, hard-to-find components elsewhere in the vehicle, proactive part sourcing is wise.
Preventative Maintenance for Window Regulators
While manual window regulators are mechanically simpler than power ones, preventative care can extend their lifespan. Regularly inspect the regulator mechanism for signs of wear, corrosion, or loose connections. Lubricating moving parts with a silicone-based spray can reduce friction and ensure smooth operation. Addressing minor issues promptly prevents escalation into costly repairs.
Specifically for vehicles prone to regulator failure, like the VW MK4, consider proactively replacing the plastic regulator clips with upgraded metal versions. This simple upgrade addresses a common failure point. Careful handling when operating the window, avoiding abrupt movements, also minimizes stress on the system. Consistent attention can avoid unexpected breakdowns.
Resources for Further Information
For detailed repair manuals specific to your vehicle, consider subscribing to online automotive repair databases or purchasing a dedicated repair guide. Online forums dedicated to your car’s make and model—like VW MK4 forums—are invaluable resources for troubleshooting and sharing experiences with other owners. YouTube channels specializing in automotive DIY repairs often feature step-by-step guides for manual window regulator replacement.
Dealer diagnostic services can provide a professional assessment of window regulator issues, though they come at a cost. Parts suppliers’ websites often include exploded diagrams and compatibility information. Remember to verify part numbers before ordering. Finally, local automotive repair shops can offer advice and assistance if you encounter difficulties during the repair process.