LCI Leveling System Manual: A Comprehensive Guide
This manual provides detailed guidance for understanding, troubleshooting, and maintaining your LCI leveling system, encompassing hydraulic components and electrical controls.
It’s essential for resolving issues like creeping jacks, Hydac valve problems, and controller malfunctions, utilizing resources like Lippert Tech Support for assistance.
Effective solutions include power cycling the controller, resetting the main breaker, and even disconnecting the negative battery cable, ensuring optimal system performance.
Understanding the LCI Leveling System
The LCI Leveling System, often a 6-point hydraulic setup, is designed to automatically level your recreational vehicle, providing stability and comfort. These systems utilize hydraulic jacks at each corner, controlled by a central control panel and a sophisticated network of valves and sensors. Understanding the core principles of operation is crucial for effective troubleshooting and maintenance.
At its heart, the system relies on hydraulic pressure to extend and retract the leveling jacks. This pressure is generated by a hydraulic pump, and regulated by valves, including the critical Hydac valve, which controls the flow of fluid to each jack. The Ground Control 2.0 system represents a significant advancement, offering enhanced automation and control features.
However, issues can arise, such as jacks slowly creeping down, indicating potential valve leakage or a problem with the manual override screw. Recognizing these symptoms and understanding the interplay between the hydraulic and electrical components is the first step towards resolving them. Familiarizing yourself with wiring diagrams and system layouts, often available through Lippert Tech Support, will further enhance your understanding.

Components of a 6-Point Hydraulic Leveling System
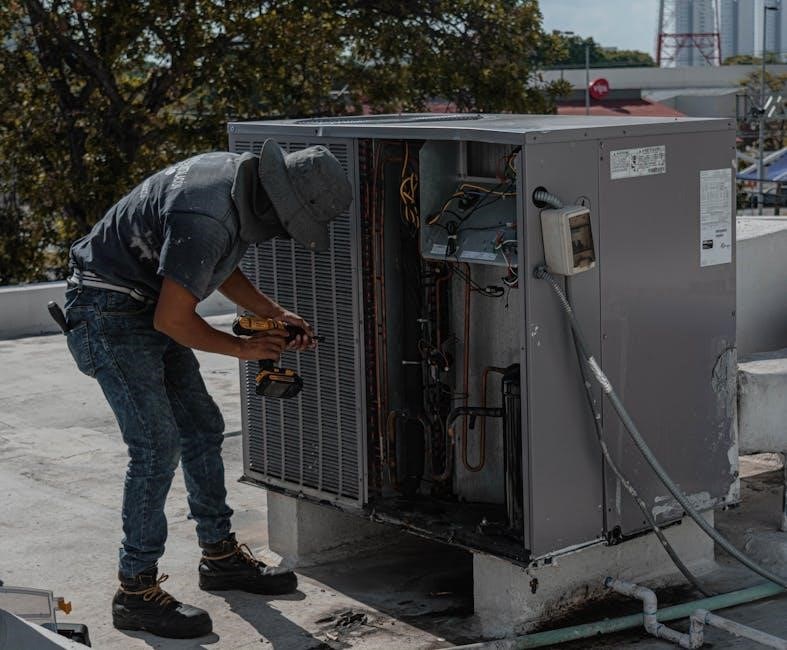
A typical 6-point hydraulic leveling system comprises several key components working in unison. These include six hydraulic jacks – one at each corner and potentially two additional stabilizing jacks – responsible for lifting and supporting the RV. A central hydraulic pump generates the necessary pressure, distributing fluid through a network of hoses and valves.

The Hydac valve is a critical element, controlling the flow of hydraulic fluid to each jack, enabling precise leveling adjustments. An electronic control panel allows users to initiate auto-leveling sequences or manually operate individual jacks. A dedicated power source, typically a 12-volt system, provides electricity for the pump and control functions.
Furthermore, sensors monitor jack extension and RV inclination, providing feedback to the controller for accurate leveling. Wiring harnesses connect all components, transmitting control signals and sensor data. Finally, a reservoir holds the hydraulic fluid, ensuring a consistent supply for optimal system performance. Understanding each component’s role is vital for effective diagnosis and repair.
Hydraulic Leveling Jacks: Function and Types
Hydraulic leveling jacks are the foundational elements of an automated RV leveling system, providing the lifting force to stabilize and level the vehicle. Their primary function is to raise and lower each corner of the RV, compensating for uneven terrain and ensuring a stable platform;

Generally, these jacks operate using hydraulic cylinders, extending and retracting based on fluid pressure controlled by the system’s pump and valves. Two primary types exist: telescoping jacks, which consist of nested cylinders extending sequentially, and single-stage jacks, offering a simpler design with limited extension.
Telescoping jacks provide greater extension range, accommodating more significant ground variations. All jacks feature a footpad to distribute weight and prevent sinking into soft surfaces. Maintaining jack seals and checking for leaks are crucial for optimal performance. Proper operation involves extending jacks until ground contact, then leveling the RV before fully lifting it off the tires.
LCI Ground Control 2.0 System Overview
The LCI Ground Control 2.0 system represents a significant advancement in RV leveling technology, offering automated and manual control over your vehicle’s stabilization. This electric system utilizes a central control panel to operate six hydraulic leveling jacks, providing precise and efficient leveling on various terrains.
Key features include automatic leveling with a single touch, manual control for individual jack adjustments, and a diagnostic mode to identify potential system issues. The system integrates with the RV’s electrical system, drawing power from the 12-volt battery.
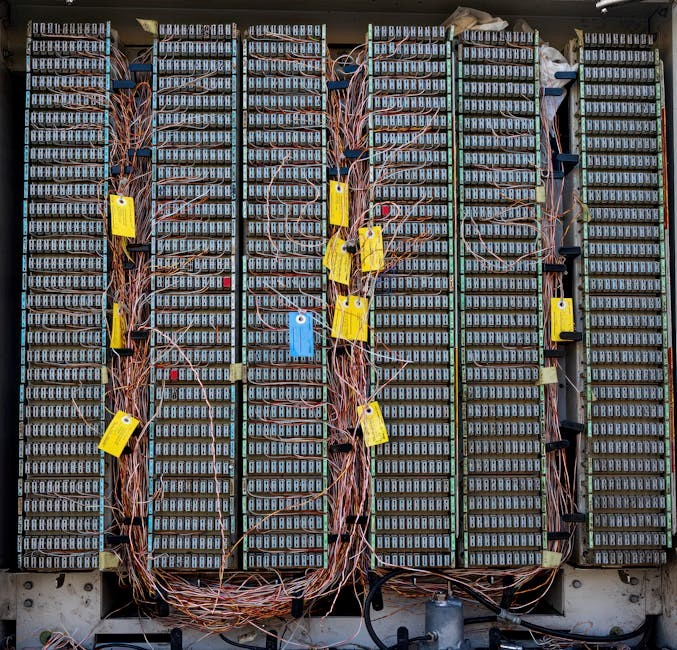
Ground Control 2.0 incorporates a Hydac valve for precise hydraulic flow control and a controller that manages the entire leveling process. Troubleshooting often begins with the controller, as reported by Lippert support, and can involve power cycling or a complete system reset. Understanding the wiring layout, as detailed in available PDFs, is crucial for effective diagnostics and maintenance.
Troubleshooting Common LCI Leveling System Issues
Common issues with LCI leveling systems often involve jacks that creep down, indicating a potential problem with the Hydac valve’s ability to maintain pressure. This can stem from a manual override screw not being fully tightened clockwise, or from internal or external hydraulic leaks within the system.
Electrical problems are also frequent, manifesting as a complete system failure where auto and manual leveling functions cease to operate. In such cases, the controller is a prime suspect, and Lippert recommends contacting their support line for guided troubleshooting.
Initial troubleshooting steps include power cycling the controller, resetting the main breaker, and disconnecting the negative battery cable to force a complete system reset. Careful inspection for leaks, and referencing wiring diagrams to verify electrical connections, are essential for diagnosing and resolving these common leveling system problems.
Leveling Jacks Creeping Down: Causes and Solutions
Leveling jacks slowly descending, often referred to as “creeping,” is a frequently reported issue with LCI systems. The primary culprits are typically related to the Hydac valve, responsible for holding pressure within the hydraulic lines. If the valve isn’t sealing correctly, it allows fluid to bypass, causing the jacks to drift downwards.

A common cause is an improperly adjusted manual override screw; ensure it’s fully tightened clockwise. However, creeping can also indicate internal leaks within the jack cylinders themselves, or external leaks at hose connections. Thoroughly inspect all hydraulic lines and fittings for any signs of fluid seepage.
Solutions involve verifying the manual override screw adjustment, tightening any loose connections, and addressing any identified leaks. If the problem persists, the Hydac valve may require replacement, and professional assistance from Lippert Tech Support is recommended for accurate diagnosis and repair.
Hydac Valve Problems and Diagnosis
The Hydac valve is a critical component in the LCI leveling system, controlling fluid flow to the leveling jacks. Malfunctions often manifest as jacks creeping down, inability to hold position, or complete leveling failure. Diagnosis begins with identifying the specific valve experiencing issues – typically, the front left hydraulic solenoid is a common point of failure.
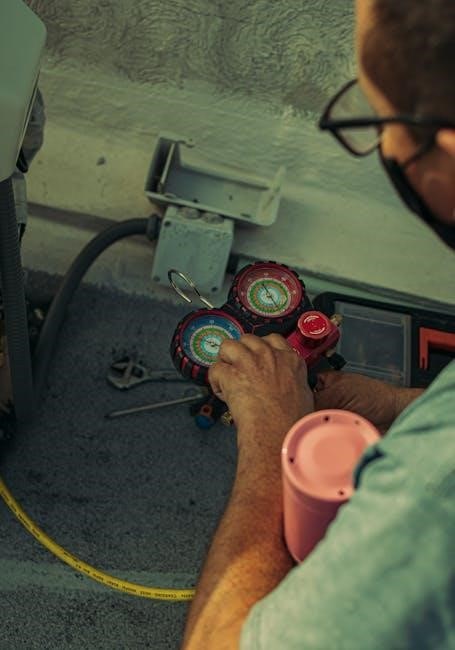
Initial checks involve verifying proper electrical connection to the valve. A multimeter can confirm voltage is reaching the solenoid when the leveling system is activated. If voltage is present, but the valve isn’t functioning, the valve itself is likely faulty. Inspect for any visible damage or corrosion.
Further diagnosis may require testing the valve’s internal components, best left to qualified technicians. Replacement is often the most practical solution. Remember to consult Lippert Tech Support for specific troubleshooting steps and part numbers relevant to your system’s configuration.
Manual Override Screw Adjustment
Each LCI leveling jack features a manual override screw, enabling operation independent of the hydraulic system. This is crucial for troubleshooting and emergency situations. Proper adjustment of this screw is vital for both raising and lowering the jacks manually, and for preventing issues like creeping.
To adjust, locate the screw on the jack’s housing. Turning it clockwise retracts the jack, while counterclockwise extends it. Ensure the screw is fully clockwise (tightened) during normal automatic operation to prevent internal leakage and maintain jack stability. A partially loosened screw can allow fluid to bypass, causing the “creeping” phenomenon.
Caution is advised; avoid over-tightening, which can damage the threads. Regularly inspect the screw for corrosion or damage. If the screw is difficult to turn, apply a suitable lubricant. Remember, the manual override is a backup system and should not be used for routine leveling.
Internal and External Leak Detection

Identifying leaks is paramount for maintaining a functional LCI leveling system. External leaks are visually apparent – inspect hydraulic lines, fittings, and the jack cylinders themselves for fluid drips or wetness. Pay close attention after extending and retracting the jacks. Any visible fluid indicates a compromised seal or connection requiring immediate attention.
Internal leaks are more subtle, often manifesting as “jack creep.” This occurs when a jack slowly lowers even with the system off, suggesting fluid is bypassing internal seals within the cylinder or the Hydac valve. A telltale sign is consistent fluid checks revealing a low reservoir level without any external leak evidence.
Regular inspection is key. Clean the jacks before each inspection to better spot new leaks. If a leak is suspected, carefully examine the Hydac valve and manual override screw for proper sealing. Addressing leaks promptly prevents further damage and ensures reliable leveling performance;
Electrical System Troubleshooting
Diagnosing electrical issues within the LCI leveling system requires a systematic approach. Begin by verifying power to the controller; ensure the main breaker is engaged and the battery is fully charged. If the auto-level functions fail while manual controls are unresponsive, the controller itself is a prime suspect, potentially needing replacement or reprogramming.

Check all wiring connections, looking for corrosion, loose connections, or damaged wires. Refer to wiring diagrams (available from Lippert) to trace circuits and identify potential breakages. A multimeter is invaluable for testing voltage at various points in the system, confirming power delivery.
Power cycling the controller – turning it off and on – can often resolve minor glitches. Similarly, a complete power reset by de-energizing the entire camper via the main breaker or negative battery cable disconnection can clear system errors. If problems persist, consult Lippert Tech Support for advanced diagnostics.
Controller Issues: Identifying and Resolving
Identifying controller problems often begins with observing the system’s behavior. If the leveling system ceases to respond to any commands – auto or manual – the controller is a likely culprit. A common first step is a simple power cycle: disconnect power to the controller, wait a few minutes, and reconnect. This can resolve temporary software glitches.
Further diagnosis may involve contacting Lippert Tech Support, who can often walk you through troubleshooting steps remotely. They may request specific information about the system’s behavior and error codes (if any). A failing controller may exhibit erratic behavior or complete failure.
Resolution typically involves controller replacement. Ensure the replacement controller is compatible with your specific LCI leveling system model. Proper wiring and configuration are crucial after installation. Always consult the LCI documentation or a qualified technician for assistance with controller replacement and setup.
Power Cycling the Controller for Reset
Power cycling the controller is a straightforward, non-invasive troubleshooting step for many LCI leveling system issues. This process effectively restarts the controller’s internal software, potentially resolving temporary glitches or communication errors. Begin by locating the controller unit – typically found in an accessible compartment within the RV.
To power cycle, completely disconnect the power supply to the controller. This usually involves switching off a dedicated breaker or disconnecting a power wire. Allow the controller to remain unpowered for at least five minutes to ensure a complete reset.
After the waiting period, reconnect the power supply. Test the leveling system by attempting both automatic and manual leveling functions. If the system responds normally, the power cycle was successful. If the issue persists, further troubleshooting steps, such as checking the main breaker or battery connections, may be necessary.
Main Breaker Reset Procedure
Resetting the main breaker is a crucial step in diagnosing and resolving issues with your LCI leveling system, as it completely cuts power to the entire system, offering a more comprehensive reset than simply power cycling the controller. Locate the main breaker, typically found in the RV’s electrical panel, often alongside other circuit breakers.
To perform the reset, firmly switch the main breaker to the “OFF” position. It’s vital to ensure a complete disconnection of power. Wait for a minimum of thirty seconds – allowing capacitors to discharge and ensuring a full system reset – before switching the breaker back to the “ON” position.
Following the reset, test the leveling system’s functionality. Attempt both automatic and manual leveling operations. If the system now operates correctly, the main breaker reset resolved the issue. If problems persist, consider further investigation, including checking battery connections and the controller itself.
Negative Battery Cable Disconnection
Disconnecting the negative battery cable represents a more forceful reset method for the LCI leveling system, effectively eliminating all electrical power and potentially resolving stubborn controller issues. This procedure should be undertaken cautiously, as it resets all RV electronics, not just the leveling system.
To disconnect, locate the RV’s battery bank. Using a wrench, carefully loosen the nut securing the negative (-) battery cable to the battery terminal. Gently remove the cable, ensuring it doesn’t accidentally contact the terminal. Allow at least five minutes for all residual power to dissipate before reconnecting.
Reconnection involves carefully reattaching the negative cable to the terminal and tightening the nut securely. After reconnection, test the leveling system. If the system functions normally, the disconnection successfully reset it. If issues remain, further diagnostics are necessary, potentially involving the controller or hydraulic components.
Manual Operation of Leveling Jacks
Manual operation of the leveling jacks provides a crucial bypass for the automatic system, allowing for independent control of each jack when the electronic controls fail or during diagnostic procedures. This method utilizes the manual override screw located on each jack assembly.
To operate manually, locate the override screw on the jack. Using a wrench, turn the screw clockwise (CW) to extend the jack and counter-clockwise (CCW) to retract it. Exercise caution and ensure the RV is adequately supported before lifting or lowering. It’s vital to ensure the Hydac valve is fully closed before attempting manual adjustments.
This method is particularly useful for making minor adjustments or for troubleshooting individual jack issues. Remember to retract all jacks fully before traveling. Manual operation should only be used when the automatic system is malfunctioning or for precise leveling adjustments.
Bypassing the Automatic System
Bypassing the automatic leveling system becomes necessary when encountering controller failures or significant electrical issues preventing normal operation. This allows for manual control of the leveling jacks, ensuring the RV can still be safely leveled and stabilized at a campsite.
The primary method involves utilizing the manual override feature on each leveling jack. By accessing and turning the override screw, you can independently extend or retract each jack, effectively circumventing the electronic controls. Prior to bypassing, ensure the main breaker is switched off to isolate the automatic system.
Carefully and slowly operate each jack, monitoring for any resistance or unusual noises. Remember that bypassing removes the automatic safety features, requiring extra vigilance during the leveling process. This is a temporary solution until the automatic system can be properly diagnosed and repaired.
Lippert Tech Support Resources
Lippert offers extensive support resources for owners experiencing issues with their leveling systems. Recognizing the complexity of these systems, Lippert provides multiple avenues for assistance, ensuring timely resolutions to common problems. Direct phone support is available, allowing owners to speak directly with trained technicians who can guide them through troubleshooting steps.
A valuable resource is Lippert’s online support portal, which hosts a comprehensive library of documentation, including owner’s manuals, wiring diagrams, and troubleshooting guides. These resources empower owners to diagnose and potentially resolve issues independently. Furthermore, Lippert actively participates in online forums, such as Keystone Forums and Heartland Owners Forum, providing expert advice and support to the RV community.
For complex issues, Lippert may request owners to call their support line while at the coach, enabling technicians to walk them through specific diagnostic procedures. This personalized approach ensures accurate identification and resolution of leveling system problems.
Finding Wiring Diagrams and System Layouts
Accessing accurate wiring diagrams and system layouts is crucial for effective troubleshooting and repair of your LCI leveling system. Fortunately, Lippert provides several resources to help owners locate this vital information. Lippert’s online support portal serves as a central repository for documentation, including detailed wiring schematics and system overviews.
RV owners have found success in tracing the system’s layout by referencing information shared on platforms like Keystone Forums. One user meticulously documented their system’s wiring, creating a valuable resource for others facing similar issues. These community-sourced diagrams can supplement Lippert’s official documentation, offering a more personalized perspective.
When contacting Lippert Tech Support, be prepared to provide your RV’s make, model, and year. Technicians can often direct you to the specific wiring diagram relevant to your unit. Remember to save any diagrams or layouts you find for future reference, as they will be invaluable for ongoing maintenance and repairs.